Good and excellent Tuesday days of Retarte!
After a blessed vacation, we return to our challenges and we do it in a super fun way with one of our most beloved sponsors:
¡Buenos y excelentes días de martes de Retarte!
Después de unas bendecidas vacaciones, retomamos nuestros retos y lo hacemos de una forma super divertida con uno de nuestros sponsors mas queridos:
Remember that The Cutting Cafe is a store that has a wide range of both physical and digital options to cover our needs escraperas.
Today I worked with two files:
Recuerden que The Cutting Cafe es una tienda que cuenta con una extensa gama de opciones tanto físicas como digitales para cubrir nuestras necesidades escraperas.
El día de hoy he trabajado con dos archivos:
This as the name implies is a cutting file, designed for a card, but as it is beautiful and literally multi functional, I used my cut in a single layer as a large Title for a letter size LO of my favorite model:
Éste como su nombre lo indica es un archivo de corte, diseñado para una tarjeta, pero como es precioso y literalmente multi funcional, yo usé mi corte en una sola capa como un Título grande para un LO tamaño carta de mi modelo favorita:
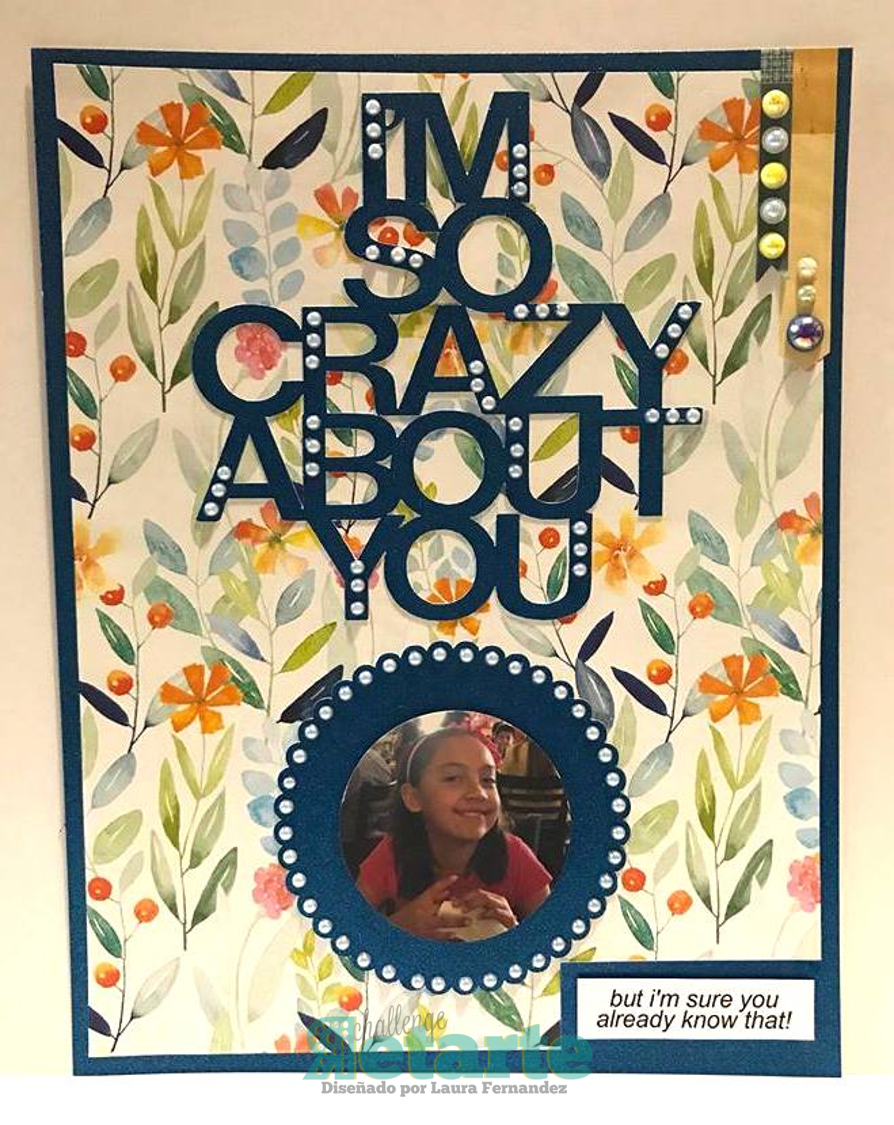
I started with a navy blue Stardream cardboard base, on which I placed floral design paper, originally letter size but to let see my base paper in the form of a frame I cut an inch of edges and pasted it, on it I placed my Title cut out of Same shape in navy blue and decorated with white pearls stockings.
My little photo was cut with a round punch and I placed it in the center of a scalop die cut decorated with pearls in combination with the title. As an embellishment I only added two small strips of paper once more decorated with pearls stockings but this time colored in the upper right and finally I added my journal which is a phrase that also comes in the file of The cutting cafe.
I loved the result!
And since in Mexico we are just beginning the school year, I have been extremely busy with all the activities of lining and labeling books, and as school accessories, I like to make book dividers, and for this purpose I used another beautiful file of short of the same store :
Comencé con una base de cartulina Stardream azul marino, sobre la cual coloqué papel de diseño floral, originalmente tamaño carta pero para dejar ver mi papel de base en forma de marco recorté una pulgada de bordes y la pegué, sobre ella coloqué mi Título cortado de igual forma en azul marino y decorado con medias perlas blancas.
Mi pequeña foto fue cortada con una perforadora redonda y la coloqué en el centro de un die cut de scalop decorado también con perlas a combinación con el título. Como embellishment solo agregué dos pequeñas tiras de papel una vez mas decoradas con medias perlas pero esta vez de colores en la parte superior derecha y finalmente agregué mi journal que es una frase que también viene en el archivo de The cutting cafe.
¡Amé el resultado!
Y como en México recién estamos comenzando ciclo escolar, he estado sumamente atareada con todas las actividades de forrar y etiquetar libros, y como accesorios escolares, me gusta hacer separadores de libros, y para éste fin usé otro precioso archivo de corta de la misma tienda:
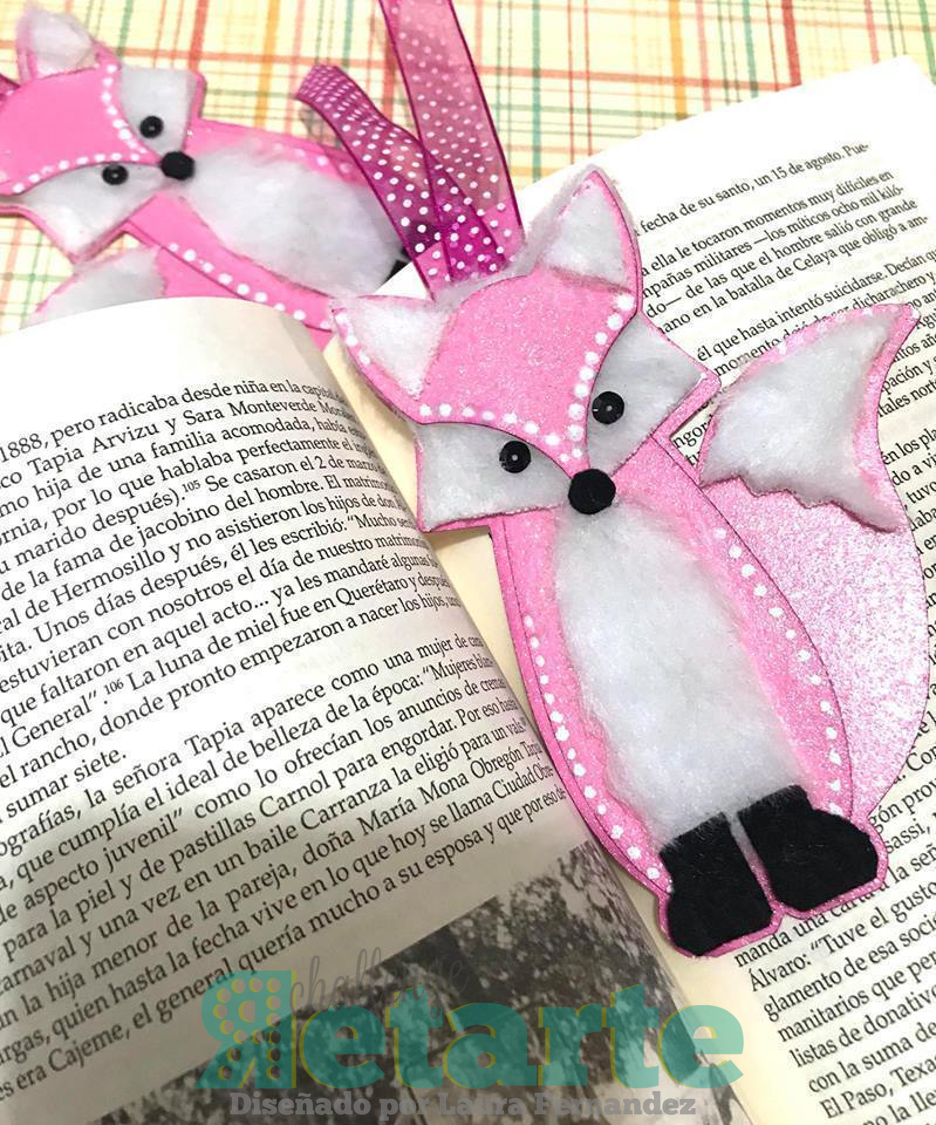
Again it happens that the original design was created to make a card, but as I can cut it into a single layer, I loved this beautiful little fox to fulfill the function of an original separator.
I cut the layers of my figure in pink glitter paper, and in white stock card paper. I started by gluing the white layers on some cloth that we call here «stuffed animal», and then I cut again, this time by hand those little pieces, which were the panzita, the base of the face, the tip of the tail and the center of the ears of the fox; I also cut, this time in black felt boots and nose.
Later I fitted and pasted my layers and on the back I pasted a bit of ribbon to the combination and, I have an original and different separator that today will go to school with my daughter, who by the way asked me for more, so I made this one separator in different colors.
The truth is that it is a precious file that would equally serve as a focal point of a card or as an embellishment for an LO. But as I like to wear it and see it very often, because a book splitter is an ideal option.
De nuevo ocurre que el diseño original fué creado para hacer una tarjeta, pero como puedo cortarlo en una sola capa, me encantó éste precioso zorrito para cumplir la función de un original separador.
Corté las capas de mi figura en papel purpurina rosa, y en papel card stock blanco. Comencé pegando las capas blancas sobre algo de tela que aquí llamamos «peluche», y luego recorté de nuevo, esta vez a mano esas pequeñas piezas, que fueron la panzita, la base de la cara, el pico de la cola y el centro de las orejas del zorro; también recorté, esta vez en fieltro negro las botas y la nariz.
Posteriormente acomodé y pegué mis capas y por el reverso pegué un poco de listón a combinación y ¡Listo!, tengo un original y diferente separador que hoy se irá a la escuela con mi hija, quien por cierto me pidió mas, así que hice éste separador en diferentes colores.
La verdad es que es un archivo precioso que igual serviría como punto focal de una tarjeta o como embellishment para un LO. Pero como a mi me gusta para lucirlo y verlo con mucha frecuencia, pues un separador de libros es una opción ideal.
Remember to visit the Blog de Retarte to learn about the requirements to participate in our fourteenth challenge, and admire the beautiful creations of my colleagues from the design team.
And of course, do not forget to visit the Shop of TThe Cutting Café , su Blog and all the options that derive from there to find a thousand great ideas for your projects.
Recuerden visitar el Blog de Retarte para enterarse de los requisitos para participar en nuestro reto catorcenal, y admirar las hermosas creaciones de mis compañeras del equipo de diseño.
Y por supuesto, no olviden visitar la Tienda de The Cutting Café , su Blog y todas las opciones que de ahí se derivan para encontrar mil ideas geniales para sus proyectos.